Search This Blog

Showing posts with label Cheap Snacks and Appetizers. Show all posts

Sunday, August 19, 2012

Little Lettuce Cups: Big Burst of Flavor


Traditional Thai restaurants often serve a tasty offering that is part salad, part grazing buffet and part appetizer. Those three parts equal a whole lot of flavor in your mouth, and a great way to turn on your taste buds.

It's a very simple idea: some sour, some sweet, some salt, some fruit.

For our cups we used baby romaine leaves, but any green will do. We've had them in cabbagey Asian greens, Boston lettuce leaves and green leaf lettuce.

The idea is to put a little of each of seven ingredients into the leaf along with an Asian sauce, then roll it up and pop it in your mouth. A wonderful, before-meal treat.

The sauce can be sweet or savory. For ours, we mixed two Tablespoons of Hoisin sauce, two Tablespoons of crunchy peanut butter and one Tablespoon of soy sauce. If you want spicy, add a teaspoon or less of rooster paste or srirachi sauce.

The seven tasty ingredients:

Coconut, sweet or savory, toasted in a small dry pan
Peanuts, not salted, toasted in a dry pan
Ginger, chopped
Lime, chopped into small pieces, skin included if you want
Peppers, chopped, any degree of heat from jalapeño to bell. We used banana pepper
Onion, either raw or toasted
Shrimp, either cooked or dried. If you're vegetarian, keep the sea taste by including dried seaweed used for sushi rolls.

When we make ours, we smear the sauce on the lettuce to act as a kind of paste. Then we add about a half teaspoon of coconut, a couple of peanuts, a pinch of onion, a pinch of peppers and one piece each of ginger, lime and shrimp.

Roll it up and pop it in your mouth for a fresh and wonderful burst of flavor.

A nice crisp wine such as a Sauvignon Blanc, Viognier, Pinot Grigio, or unoaked Chardonnay is a nice accompaniment.


Friday, March 16, 2012

Goat Cheese and Beet Dip


We attended a birthday party recently where one of the guests brought a delicious roasted beet and goat cheese dip. Even the beet-haters loved it, so we asked for the recipe. Turns out it was from Dave Leiberman of the Food Network.
The flavor of the beets is enhanced by roasting the beets and by the addition of chives and thyme. Here's the recipe:

Ingredients

  • 2 medium beets, leaves trimmed, or 1/2 pound roasted beets from deli or salad bar
  • 1 tablespoon olive oil
  • 4 sprigs thyme
  • Kosher salt and freshly ground black pepper
  • 4-ounce goat cheese
  • 1 small bunch chives, finely sliced
  • 1/2 lemon, juiced
  • Crostini, crackers or bread sticks

Directions

Preheat oven to 400 degrees F.
If using raw beets, wash them clean of sand and dirt. Set aside to air dry or dry well with a towel or paper towel. If using roasted beets, proceed to food processor step.
Toss the beets in a mixing bowl with oil, thyme, a few pinches of salt and about 15 grinds of pepper.
Turn the beets out onto a baking sheet and roast until fork tender, shaking the pan occasionally to insure even cooking, about 40 minutes.
Remove beets from oven and set aside to cool. (You can do this up to a couple days ahead of time if you store them sealed in the refrigerator.)
Remove and discard the skins from the beets. Cut beets into quarters. Add the beet quarters to a food processor or blender. Pulse a few times until beets are roughed up into small but still chunky pieces.
Dump the blended beets into a serving bowl. Crumble the goat cheese into the beets and add the chives and lemon juice. Toss together and season with salt and pepper, to taste.
Serve with crostini or breadsticks.

Sunday, February 5, 2012

Last Minute Appetizers: Quick & Easy Bean Dips

We would find it hard to believe that the Super Bowl crept up on anyone, but let's imagine for a minute that the host of a party got sick and you volunteered to take on the hosting duties. Here are two very easy dip recipes for the big game that will tax neither your wallet or your cooking ability.

Complementary white bean and black bean dips for chips: preparation time, mere minutes.

Ingredients:
1 can (15.5 oz.) white Great Northern, Navy or Cannellini beans (Great Northern or Navy preferred), drained
1 can (15.5 oz.) black beans, drained
1 medium onion, divided into two halves and chopped
1/2 teaspoon salt, divided in two
1/4 teaspoon black pepper
1/4 teaspoon white pepper (or black if you have no white pepper)
1/2 teaspoon ground sage
1/2 teaspoon ground cumin
3 Tablespoons Parmesan cheese
4 garlic cloves
1 4.5 oz. can chopped green chiles, drained
1/4-1/2 cup sliced green onion tops

Recipes:
For the White Bean Dip
In a food processor, combine the white beans, half the onion, Parmesan, half the salt, white pepper, and 2 garlic cloves and pulse until smooth. Taste for seasoning and adjust. Then remove to a bowl, cover and refrigerate.

For the Black Bean Dip
In the food processor, combine the black beans, half the onion, green chiles, black pepper, cumin and 2 garlic cloves. Pulse until smooth. Taste for seasoning and adjust. Remove to a bowl, cover and refrigerate.

Assemble
In the spirit of opposing teams, spoon the black dip into one half of a serving dish. Then spoon the white dip into the other half. Garnish the dish with the sliced green onion tops, especially covering the middle where the two dips meet.

Serve with your favorite chips.

Tuesday, November 29, 2011

Great App(etizer): Brie with Honey and Thyme


Here's a great — and quick — appetizer that will satisfy cheese lovers and also guests with a sweet tooth at the same time. It comes from Chris Kimball, editor of Cook's Illustrated.

Buy any old brand of Brie cheese in an 8-inch round. With a serrated knife, carefully slice off the top rind, leaving the side and bottom rind. Place the round on a microwave-safe serving plate, drizzle the brie with honey and sprinkle thyme or rosemary on top.

Heat in a microwave until the brie bubbles, probably about a minute or two. Serve with crackers to the delight of your guests. Easy, peasy!

For this recipe and other holiday cooking tips from Chris, click on this link, then click on "See the Recipes."

Tuesday, July 19, 2011

You Can Make Tapas at Home

First, apologies for the long drought of posts. We were out of town and ran into Internet problems that, like all Internet problems, were both complicated and too boring to explain.

Now that we're back, we can write a post we've been meaning to write since Ruth's birthday back in June.

We celebrated with a trip to Jaleo, a tapas restaurant run by José Andrés that has gotten great reviews. As we don't eat out that often, we tend to be extra-critical of bad food and extra-delighted by good food; if the service and atmosphere also deserve high marks, we're disproportionately thrilled. This was one of those meals. Everything was great, from the opening dish of olives with tiny cubes of marinated Manchego cheese to the final bowl of olive oil ice cream and grapefruit sorbet. Best of all, we figured that we could reproduce our favorite dishes back home.

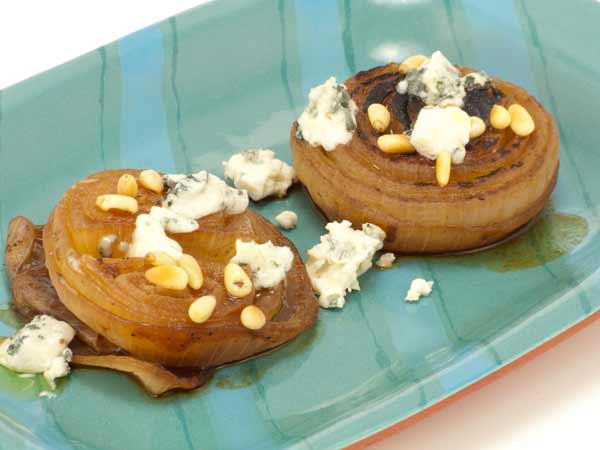
Usually, it takes at least a few tries to successfully approximate a restaurant dish, but the first one we tried—poached onions with blue cheese and pine nuts—came out great. We were astonished by how easy it was.

Because this can be made ahead of time and either warmed up or served at room temperature, this would make an excellent first course. We plan to use it as part of a homemade tapas lineup (our next post, also poached from Jaleo: stuffed peppers with tapenade).

You'll notice that one of the onions in the photo looks charred. That's because we experimented with grilling half of the onions in the recipe, wondering if that would make a difference. It did seem to add flavor, though the nongrilled onions tasted great too.

Onions with Blue Cheese and Pine Nuts

Two fat onions
6 cups vegetable or chicken stock
Salt and pepper to taste
1/4 cup crumbled blue cheese
1/4 cup toasted pine nuts
2 T. olive oil

1. Peel the onions and halve them through their centers, leaving their stem ends intact so they don't fall apart during the poaching.

2. Place them cut-side down in a deep skillet and pour the stock over them. Bring it to a boil, then reduce to a low simmer. Let the onions simmer until the stock is mostly evaporated and they are tender all the way through—depending on the size of the onions, this can take as a long as an hour.

3. While the onions poach, toast the pine nuts and crumble the blue cheese.

4. When the onions are tender, remove them to a plate, sprinkle them with pine nuts and blue cheese, and drizzle them lightly with olive oil.

Serves four.

Thursday, April 14, 2011

Three Ways to Use Stale Pita Bread

 
The other day we were standing before our open freezer, lamenting the fact that we couldn't squeeze any more food in. Clearly, it was time to use up some of our frozen reserves. So we pulled out the leftover package of whole-wheat pitas from the top shelf, only to spot another partial package of pitas behind it   . . . and another one behind that. Standing there laden with icy bags, we were forced to admit the uncomfortable truth: we are pita hoarders.

Fortunately, it's easy to use up leftover pita bread. Here are three good ways, all of which we are employing this week.

1. Pita Chips. We based this extremely flexible version on a recipe by Ellie Krieger. Whereas Ellie uses cumin and coriander, we had a hankering for garlic and smoked paprika. Any combination of spices and oil would work.

Spiced Pita Chips

3 big whole-wheat pitas, torn into chip-sized pieces and separated so there are no double thicknesses
2 T. olive oil
1/2 t. garlic powder
1/2 t. smoked paprika
1/2 t. crunchy sea salt

1. Preheat oven to 350 degrees.

2. Place the pita pieces in a good-size bowl. Mix the oil with spices and salt, then pour over the pita pieces, taking care to cover them as evenly as possible.

3. Spread the chips on a baking sheet and bake for 15 minutes, tossing them around midway for even cooking.

2. Pita Croutons. We've written about these before. Like the chips, they can be coated with any spice or no spices at all. Like croutons, they add crunch and interest to a green salad.

3. Pita Toast. Chances are, your leftover pita bread is too tough to stuff with hummus or other sandwich makings. But you can still use it as bread, provided that you don't try to open it up. Cut a pita in half, run it through the toaster, and use the two halves as you would use two slices of regular bread. Or you could dip the crunchy pieces into hummus, tabbouli, or tuna salad.

Leftover stale pita bread may present even more opportunities than its fresh equivalent.

Saturday, March 12, 2011

Crunchy Indian Salad

First off, we have to acknowledge that this salad isn't for everyone. Some people (mystifyingly) just don't like Indian food, and others might have trouble finding some of the ingredients. But if you love Indian flavors, you'll be willing to track down what you need, either at an Indian grocery or online.

The good news is, this has only a handful of ingredients and can be whipped up in about ten minutes. It would be especially good on a hot summer night, either as part of a bigger meal or all by itself. With complete protein, it offers all you need nutritionally.

The chief ingredient is bhel mix, which is more or less an Indian version of Chex Mix, with puffed rice, chickpea-flour crunchies (known as "sev"), and assorted spices. Indian stores usually have a gigantic selection of these bagged mixes, in varying levels of hotness. We've had good luck with the Gujarat blend, which is not overly spicy but provides a nice warm buzz.

We first had this in a restaurant (listed on the menu as "Bhel Puri") and were able to duplicate it pretty successfully at home.

Crunchy Indian Salad*

2 1/2 cups bhel mix
2 Roma tomatoes, diced
1/4 cup onion, diced
1/4 cup cilantro, minced
1 hot chili pepper, minced
3 T. tamarind chutney (or more, depending on dryness of salad and how much you like this sour flavor)
Lime quarters

Mix all ingredients. If you're feeling fancy, you can mold it into a small bowl and upend on a plate before serving. Squirt each portion with lime juice before eating.

Serves two gluttons, or four people as an appetizer.

* Some recipes call for about a half a cup of mashed potato, and although we haven't tried this, we bet it's good.

Thursday, February 3, 2011

Five Easy Super Bowl Snacks

Yep, it's Super Bowl time once again, which means newspaper food sections are scratching their heads trying to come up with new ideas. Well, some are; others, like the Washington Post, are throwing in the creative towel: today the Post seriously compares the nutritional value of Doritos and Utz cheese balls.

But it's possible to have a fun Super Bowl without spending a fortune or loading up on junk. Here are five snacks that can be easily and inexpensively made at home:

1. Fried cheese. Both of these recipes can be made in minutes and will deliver more flavor than a whole tub of Utz cheese balls.

2. Spiced nuts. We talk about these a lot because they are so easy and fast to make, and cheap if you buy nuts in quantities at places like Costco. Here are two good recipes.

3. Sunflower snappers. Easy, fast, delicious, and because you make them yourself, you control the salt.

4. Tapenade. You can spread this pungent olive paste on toast, scoop it up with vegetables, or add it to a salad dressing. Loads of flavor and little fat.

5. Kale chips. We're still getting grief over our many kale-chip recipes of a few summers ago. But kale is abundant in the winter, and these chips make a fine accompaniment to fried cheese. Don't knock them until you've tried them!

Now, what to drink? A Riesling would work well with salty snacks; look for Jacob's Creek Reserve Riesling, which can still be found for less than $10. And for a good red, you can't go wrong with the 2008 Red Diamond Merlot we discovered at last weekend's wine tasting. You can find it at Safeway and Trader Joe's, among other stores.


Thursday, January 20, 2011

Make It Yourself: Tamari Almonds

Sure, you can buy packages of delicious, salty Tamari Almonds at the supermarket, but they tend to be very expensive and not particularly fresh. Fortunately, they are one of the easiest and fastest snacks to make. We make them when we need a quick cocktail snack and don't have time for even our usual fast-and-easy snack, Spiced Nuts.

Tamari Almonds

1. Heat a teaspoon of sesame or peanut oil in a pan over medium-high heat, then add two cups of raw almonds. Stir them to coat with the oil, and stir frequently to avoid burning. (Once nuts begin to burn, they really burn!)

2. After about ten minutes, the nuts will be brown with a few dark spots; when this happens, remove the pan from the heat and add two tablespoons of tamari or other soy sauce. It will sizzle and almost completely evaporate, which is fine. Stir to mix with the nuts. If you like, you can add a few shakes of Liquid Smoke, which adds a flavor reminiscent of that old favorite, Smokehouse Almonds. (You usually can find Liquid Smoke near the ketchup in your supermarket.)

3. Add a very light sprinkling of sea salt for crunch, but be careful not to oversalt on top of the salty tamari.

Then all you need to do is restrain yourself from eating all of the nuts before serving them.

Thursday, October 14, 2010

Fast and Easy Appetizer: Spiced Nuts

Most people have a favorite quick-and-dirty recipe they pull out when they need to make a fast cocktail snack or party appetizer. For us, it's spiced nuts. We found this recipe years go in Martha Stewart Living, adapted it a bit, and have been relying on it ever since. As Costco shoppers, we always have big bags of nuts on hand, so this is very easy for us to pull together.

Any kind of nut works in this recipe, but we've found that nuts with lots of nooks and crannies, like walnuts and pecans, deliver the best results, as they can hold a lot of spices.

Spiced Nuts

1 large egg white
1/4 c. sugar
1 t. chili powder
1 t. salt
1/2 t. cumin
1/2 t. cayenne pepper*
1/4 t. allspice
2 1/2 c. mixed nuts (though they don't have to be mixed; if all you have are almonds, those will work fine)

1. Preheat oven to 300 degrees.

2. Place the egg white in a medium-size bowl and rapidly whisk by hand until it is foamy.

3. Stir in the sugar, chili powder, salt, cumin, cayenne, and allspice.

4. Fold in the nuts, taking care to cover each nut with the spice mixture.

5. Spread on a baking sheet and bake for 15 minutes. Remove the pan and stir up the nuts with a spatula, then return the pan to the oven, reducing the temperature to 250 degrees. Bake for an additional 10 to 15 minutes, until the nuts are lightly brown and no longer wet.

6. Remove the nuts from the oven, stir, and let cool. They will keep for a couple of weeks in a covered container. They also freeze well.

* The amount of cayenne pepper is really a matter of taste. This amount works well for an average group of people with average heat preferences. Heat lovers will want more spice, though, so feel free to add more—Martha's recipe calls for 1 3/4 teaspoons!

Tuesday, August 10, 2010

Fried Parmesan Crisps—Great Garnish, Great Appetizer

Known in the foodie world as frico, these delicate cheese crisps dress up salads and pasta dishes and make excellent quick appetizers. And they could not be easier to make. All you need are a chunk of parmesan, a grater, and a nonstick pan.

Once you've grated your cheese, turn the heat under your pan up fairly high, then sprinkle the cheese in thin circles on the nonstick surface. Be careful not to pile up the cheese, or the crisps won't be very crispy—a light, lacy pattern is best. Admittedly, the cheese in this photo doesn't follow any particular pattern; if we were showing off for guests, we would make more of an effort to keep the crisps round:


Within a couple of minutes, the cheese will be melted and starting to brown. Turn down the heat to medium and let the cheese cook for just a few minutes more, until it is golden throughout. Then set the pan aside to cool; don't try lifting the cheese off it when it's still hot, or it will smoosh.

After a few minutes, your parmesan crisps will be ready. If you want to use them in a salad or as a garnish, you may want to set them where nobody can find them; they have a tendency to be scarfed up as soon as they're done.

Thursday, July 29, 2010

Chuck's Surprising Salsa

Our friends Chuck and Sandy have a plot in a community garden that is producing loads of tomatoes. (This is in stark contrast to our own three tomato containers, which thanks to the Evil Stalker Groundhog now bear only a few green fruit.) This means lots of gazpacho, tomato sauce, and salsa—and luckily, it means enough salsa to share. Chuck has made the most of his garden bounty by incorporating surprising ingredients like tarragon and oregano, with delicious results.

The lesson: Don't be afraid to play around with flavors. Experiment with what you have on hand, and chances are, you'll come up with a winning combination.

Salsa

8 medium-size tomatoes
2 small onions
2 cloves of garlic
1 medium cucumber
2 small hot peppers, with seeds
1 generous t. thyme
1 generous t. parsley
1/2 t.  oregano
1/2 t. tarragon
2 small hot peppers, with seeds
Hot sauce, salt, and pepper to taste. 


 Chop vegetables and place in blender with herbs, hot sauce, salt, and pepper. Blend, then strain to desired consistency—if you like it wet, leave the juices in. If you like it thicker, the strained juice makes a good, spicy Bloody Mary mix!

Thursday, July 15, 2010

Got Roasted Peppers? Here's an Easy Summer Spread

For years, it seems, we've been reading about muhammara, a Middle Eastern dip made from roasted red peppers, walnuts, breadcrumbs, and pomegranate molasses. Though intrigued, we couldn't get our minds around how those flavors would add up, and in any case, we never seemed to have them all on hand at the same time.

But a few weeks ago we had a few leftover roasted peppers, as well as a rarely deployed bottle of pomegranate glaze from Trader Joe's, so we decided to try making the spread, using a recipe from Saveur.

It was easy and fast—requiring only a food processor—but we ignored Saveur's advice to let it sit overnight before we tried it, and we found the immediate results disappointing: the dip just tasted like mealy mushed peppers.

We should have listened to Saveur. When we tried the muhammara the next evening, we could no longer pick out peppers or nuts or pomegranate; the flavors had melded into something special. We spread it thickly on toasted pita bread and ate it for dinner with a green salad.

Lesson: No matter how much of a hurry you're in to taste something, sometimes you just have to wait for the magic to happen.

Friday, July 2, 2010

Fried Sage Leaves Make a Delicious Garnish

Amazingly, our potted sage plant survived last winter's low temperatures and six feet of snow. After the thaw, we moved the plant to our herb bed, where it's happily taken off, holding its own against an advancing army of mint.

Sage tends to be used in fall and winter recipes, as it pairs well with turkey, squash, and roasted potatoes. In the summer there's not a whole lot of call for it, unless we use it as a garnish.

Fried in a little olive oil, then sprinkled with sea salt, whole sage leaves make an excellent garnish. Last night we used them to dress up a plain pasta dish; they're also good on risotto. We've even been known to serve them with cocktails.

The only thing you need to remember when frying the leaves is to let them go a while, until they've turned crispy and a dark, kelp-y green. Resist the temptation to turn off the heat when the leaves are a beautiful emerald green—they will be too chewy and resinous.

You can find sage leaves in most supermarkets' produce sections year-round, but it's easy to grow. Some plants overwinter, others don't—there seems to be no rhyme or reason for this. But they all thrive on little water, which makes them excellent candidates for container gardening.

Wednesday, April 28, 2010

The Pantry Project: Pesto

Our friend Sandy is working to draw down her freezer reserves in preparation for the new season of garden produce, and she's wondering what to do with all her pesto. After all, there's only so much pasta that a person can eat.


We like pesto pasta as much as—probably more than—the next people, but we agree: a little bit goes a long way. Fortunately, there's pesto pizza.


When we lived in San Francisco, one of our favorite places to eat was a Chinese-Italian restaurant in the Mission district. This wasn't one of those fancy fusion places, but a busy neighborhood joint that specialized in takeout. We always ordered the same thing: pesto pizza and pot stickers. 


The pizza was elegantly simple: a thin, crunchy crust covered with a layer of pesto and sprinkled liberally with parmesan cheese. It went surprisingly well with the vinegar-dipped pot stickers. 


San Francisco is only a delightful memory at this point, but we still make the pizza whenever we need to use up some pesto.


Pesto Pizza


1. Heat your oven to 450 degrees.


2. Get your crust ready. You can use either raw dough or a premade, Boboli-type crust.


3. Spread the crust with an even layer of pesto. We generally use about a cup's worth.


4. Cover the pesto with grated parmesan. You'll probably need about a cup and a half.


5. Bake until the cheese is golden; 15 to 20 minutes should be sufficient.


That's it.


This recipe is for pesto purists, but it's easy to mix it up with other flavors. You can, for instance, cover the pesto with sliced tomatoes and mozzarella, or any topping you like. 


Cut into small slices, this pizza makes a great, quick appetizer.

Monday, February 22, 2010

Cheap, Fast, Delicious Fried Cheese Appetizer


This photo of the fried queso fresco does not do the dish justice. It is a delicious crispy treat made even better by the homemade salsa we served with it.

On Super Bowl Sunday, we were still pretty much snowed in, with little inclination to go out and forage for snacks. But we did have half a round of queso fresco, the white cheese that's often crumbled on Mexican dishes. Remembering that you can make a fine appetizer simply by grating parmesan onto a nonstick pan, we wondered if we could do a similar thing with wet but firm queso fresco.

So we cut the cheese into quarter-inch slices, carefully placed it on a nonstick griddle, turned the heat up to medium-high, and watched: After just a few minutes, the cheese had released its liquid and browned on one side. A few minutes on the other side completed the cooking process.

Good so far, but the appetizer needed a garnish. Salsa, for example.

Unfortunately, the cupboard was bare, and we remained disinclined to venture into the frozen streets to search for a jar, particularly on the biggest salsa day of the year. We did have half a can of crushed tomatoes and a leftover roasted red pepper. Along with a chopped jalapeno and a couple of sliced scallions, lime juice, cumin, cilantro, and chili powder, this made a fine improvisation—and tasted great on the hot fried cheese. Not the best salsa we've ever made — mainly because diced tomatoes would have been better than crushed — but excellent in a pinch.

If you can't find queso fresco at your supermarket, Costco usually carries it. Or you can find it at any Hispanic market. It freezes well and also makes a good quesadilla filling mixed with cheddar or Monterey Jack.

Thursday, December 24, 2009

Sunflower Snappers


Guest blogger Jim Randall offers this healthy snack recipe for the holidays:

When we want a salad topper, something healthy and satisfying to eat out-of-hand, or a snack for a holiday party, we make Sunflower Snappers, which deserve their name. Prepared properly, they "snap" in the pan. Use all organic ingredients whenever possible for the best taste and nutrition. I like using low-sodium soy sauce and adding my own unrefined salt (Himalayan, Celtic Grey, or plain sea salt).

Sunflower Snappers

1 T. organic virgin coconut oil
2 cups raw sunflower seeds
8 cloves garlic, minced
1/4 t. unrefined salt (or more) to taste
1 T. low-sodium soy sauce

1. Heat the oil in a large heavy frying pan over medium-high heat. When the oil just starts to smoke, immediately add the sunflower seeds and garlic. Stir constantly until the oil and garlic are well mixed with the sunflower seeds.

2. When a couple of the seeds start to turn golden, reduce heat to medium. Continue stirring as needed to "fry" the seeds in the oil. There should be occasional snapping. Stop cooking when about half of the seeds are golden and the garlic bits are well browned. Remove from heat and add the salt. Stir well.

3. After five more minutes, add soy sauce and stir well. Store in a jar with a tight lid—but they may not last long enough to store them.

Thursday, October 22, 2009

Again with the Kale Chips

This will be our last post on this subject, we promise. But last week's CSA box offered up a gigantic, ruffly head of curly kale, so we decided to try making chips again. Our first attempt, with dinosaur kale, resulted in delicious but very fragile chips; we wondered how the tougher leaves would work. So we cut away the stems, tore the leaves into palm-sized pieces, tossed them with about a tablespoon of olive oil and a little salt, and roasted them for about 40 minutes at 250 degrees.

The results were even better than our first batch: the thicker leaves resulted in more-substantial chips, and the longer roasting time made them so addictively crunchy that we ended up consuming the whole batch in about 24 hours.

Usually we split our CSA box with Kevin and Cynthia, but Cynthia had given us the whole bunch of kale, claiming that she didn't like it. But once she tasted the chips, she was astonished and converted.

Sunday, September 13, 2009

Kale Chips Part II

Because we know you just can't get enough of them! 

We want to try this version from ValleyWriter's blog, partly because they take less time to bake than the Bon Appetit version, partly because her other recipes sound so good that we trust her. Check them out! 

Last night, faced with a big bunch of Swiss chard from the CSA box, we tried to make chard chips. The oven was already running at 400 degrees for a batch of crispy smashed potatoes, so we figured we'd just keep a close eye on the chips. We don't know if the hotter oven was the problem or just that a wet veggie like chard wasn't up to the job, but the resulting chips, though edible, were much less tasty than their kale predecessors.

Thursday, September 10, 2009

Most Unpopular Post Ever?

We debated putting this one up because, let's face it, kale is not high on most people's favorite-food list. But last week's CSA box delivered a fat bunch of dinosaur kale, just as Bon Appetit serendipidously posted an intriguing-sounding recipe for kale chips. We're suckers for any kind of chips and, by this point in a summer of heavy CSA boxes, desperate for any new vegetable recipes, so we tried it.

The result was very crisp, very delicate, with a concentrated kale flavor and nice salty crunch. The chips resemble very thin nori. 

The whole recipe uses only one tablespoon of olive oil, so you can indulge guiltlessly. 

If you love kale, you should definitely try this, but save a few for your kale-resistant friends. You may make some converts! 

These would be good with cocktails or crumbled on cheesy or garlicky pasta.